
At this point let me point out that there are lots of ways to visualise any scale but position or box based visualisation is as good as any method at this point so don’t worry if you are uncomfortable with the idea of playing in boxes/positions. Learn this first so that you can quickly and without thought identify these root notes within this position. 
In this diagram I have labelled where each of the root notes for each chord in the Blues progression occur in the scale. If you check out the accompanying diagram for this issue you’ll find what most people call Am pentatonic position/box one. 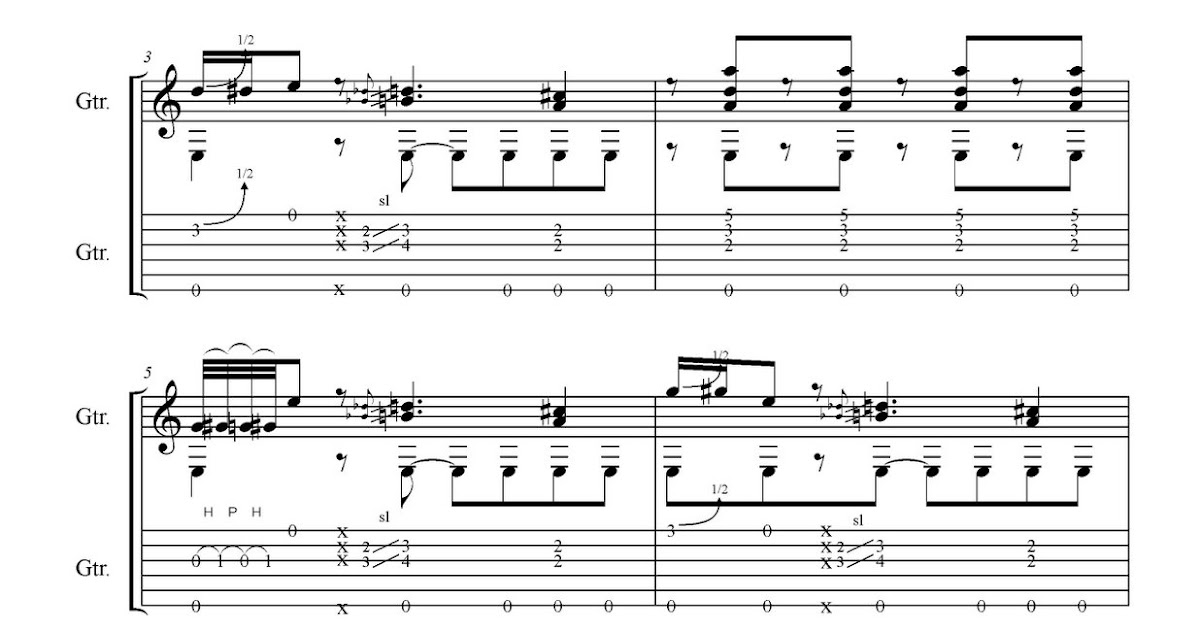.jpg "blues tablature with thumb chords")
In order to outline the sound of each chord, and thus play the harmony of the progression in our solos, we need that pesky major 3rd interval. Why would we want to do this? Well, it’s simple - the minor pentatonic scale just doesn’t cut it when it comes to outlining the sound of each chord as it goes by. If we learn where each of the root notes for the three Dominant 7th chords in the progression are within our pentatonic scale then it stands to reason that we can also learn to visualise where each of the major 3rds, not contained in the minor pentatonic scale, are for each of these root notes also. Let’s not worry about that 5th for now but rather about those 3rds that are so important to the sound of Dominant 7th chords. As you can see it contains all of the chord tones for each chord except for the 3rds (C#, F# and G#) of each chord and the 5th (B) of our E7 chord. The Am pentatonic is made up from the notes A, C, D, E, and G. Let’s have a look at the chord tones for each chord:. The Am pentatonic is interesting in many ways as it actually contains almost all of the chord tones for each of the Dominant 7th chords in our progression. The majority of players will use an Am pentatonic for the bulk of their improvisations over this progression due to the fact that it is pretty much fool-proof and all of the notes choices and phrases we have come to learn as guitar players sound great over the whole progression. This should be very familiar to most of you as a standard 12-bar Blues and, of course, there are hundreds of variations on this theme but for now we’ll stick with the simple version. To start with let’s identify our simple 12-bar Blues progression in the key of A.ĭ7 / / / | / / / / | A7 / / / | / / / / |Į7 / / / | D7 / / / | A7 / / / | / / / / || I say segueing because we’ll actually still be considering the idea of playing guitar solos over the changes within the context of our Blues chord progression but this will be a very practical session that you can apply to your playing to enhance your Blues guitar solos in any style that utilises the standard 12-bar chord progression. Subscribe to my YouTube Channel below if you are interested in fingerstyle guitar videos.Hey guys and welcome to my 25th guitar lesson column for Guitar Interactive magazine, it’s crazy how time flies when you’re having fun! We’re going to change things up a bit for this guitar lesson and move away from our Playing Over Changes ideas, segueing smoothly into some Blues lead guitar playing. Pattern 2Ĭhanging the pattern of the high notes, while playing the same bass line.Īlthough this lesson is free, a PDF of the TABs is available for your convenience and to support this website.įor a traditional Travis Picking song with tablature see “Freight Train.” Pattern 1Īdding some high notes, while maintaining a steady rhythm on the bass. In most cases, you would keep your index finger on the G string (3rd string), your middle finger on the B string (2nd string) and your ring finger on the high E string (1st string). Chet Atkins used his index, middle, and ring, the way most players, myself included, do it today. Merle Travis used only his index finger to pluck the higher strings. Now that we’ve got the bass line down, we are ready to start adding the melody and the harmony. When the notes are clean, you’ll be ready to raise the tempo. Play the exercise below until you are comfortable with it. I have also seen guitarists play it with the flesh of the thumb while still managing to mute the bottom three strings. I play it using the flesh of my thumb without muting the strings. The most popular method is to use a thumb-pick while muting the strings with the palm of your hand. The Bass LineĪside from keeping a steady pattern, there are a few ways to play the bass line. It involves playing a bass pattern with the thumb while plucking the higher strings with the index, middle and ring fingers. Travis Picking is a fingerstyle guitar technique named after Merle Travis. I’ve included guitar tab and chord diagrams for the chords we will be using. 
This post features two Travis Picking patterns for beginner guitar players.
0 Comments
Leave a Reply. |
AuthorWrite something about yourself. No need to be fancy, just an overview. ArchivesCategories |
 RSS Feed
